Installation
Please ensure that you have access to Veryfi Lens SDK. If you haven't already obtained access, please refer to the
section for instructions.- iOS
- Android
- Capacitor
- React Native
- Flutter
- .NET Legacy
- .NET MAUI
Installation with Swift Package Manager (SPM) (Recommended)
1. In Xcode go to File -> Add package dependencies and in the search field on the top right put the package url
https://repo.veryfi.com/shared/lens/veryfi-lens-spm.git
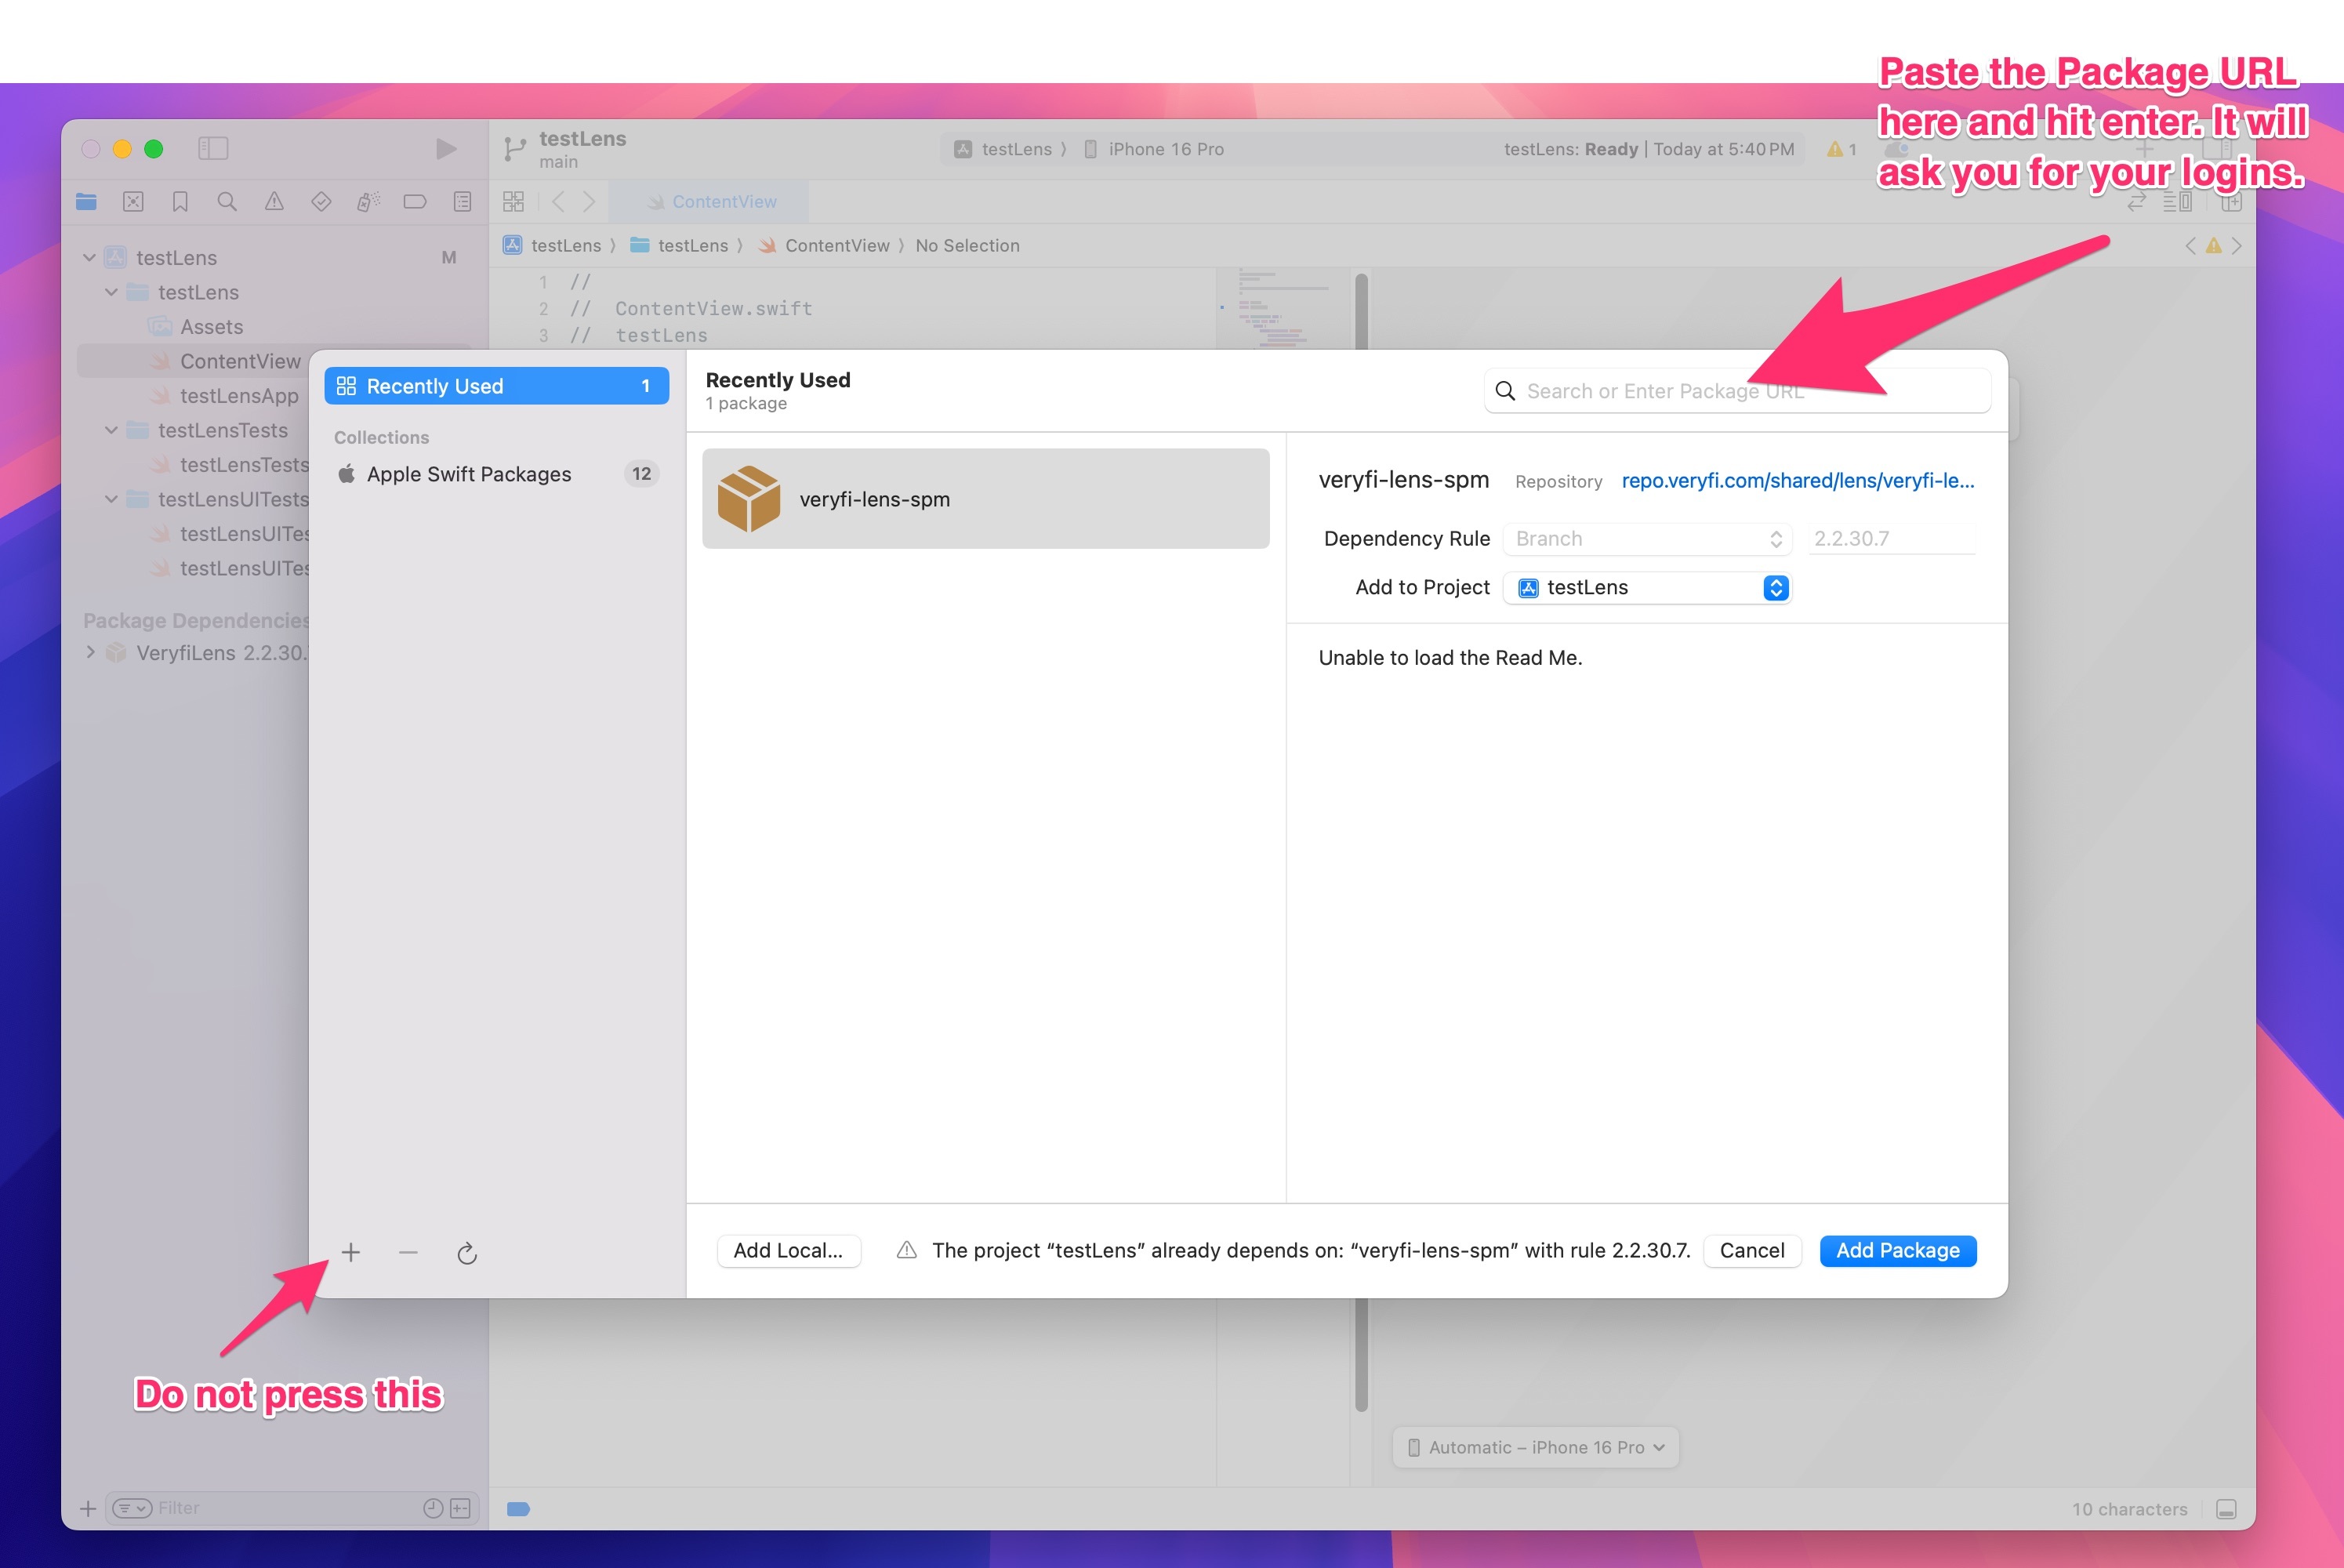
2. You'll be prompted to put Username and Password to download the package, you must use the same credentials created for cocoapods in the web hub.
3. Pick the version you want from the available branches or use master to pull the latest version of the package.
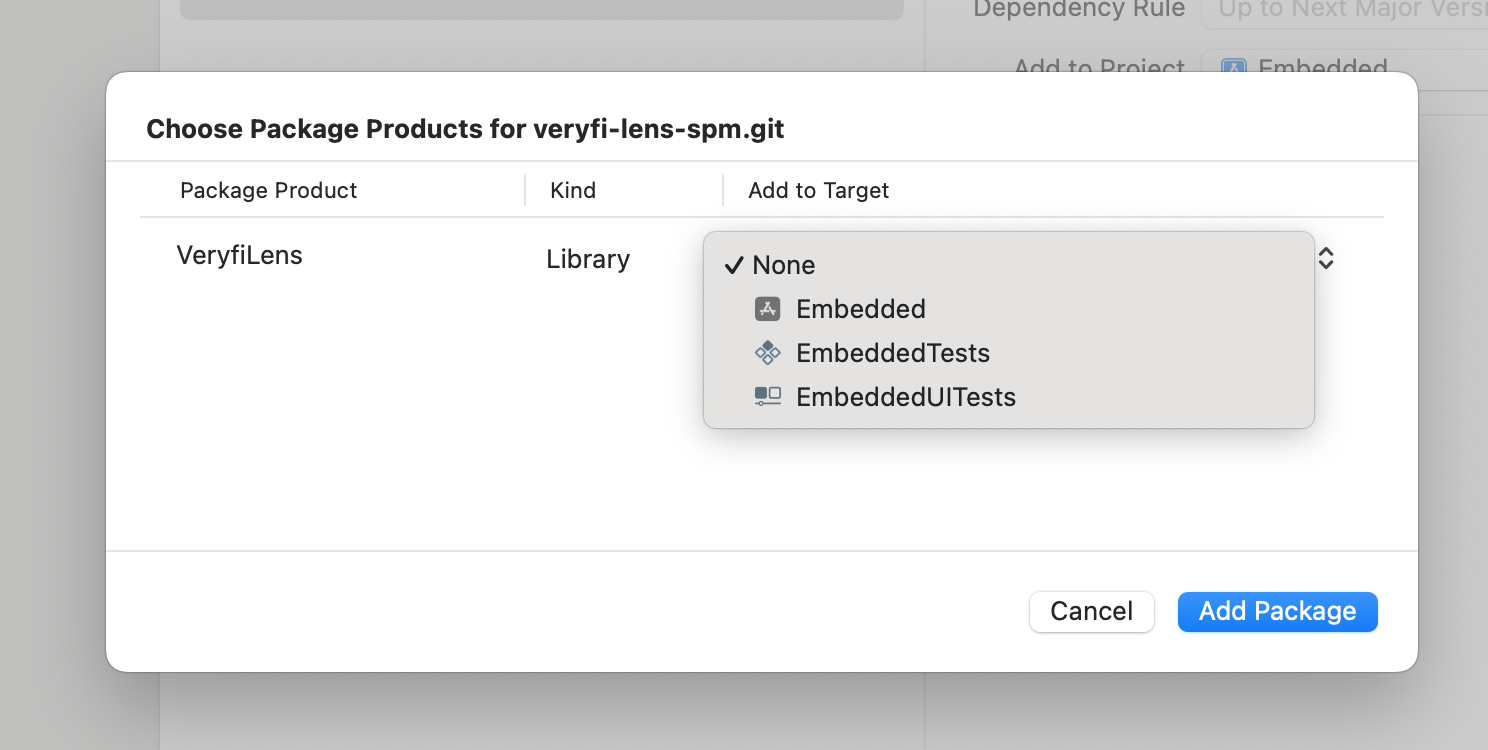
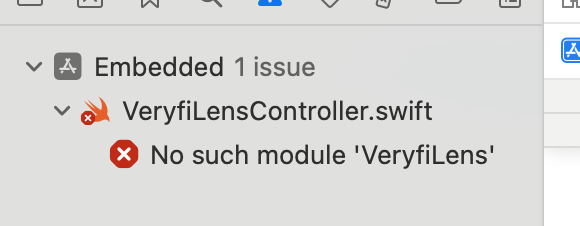
4. To avoid "No such Module" error, make sure that the package is added to the project Targets where you want to use the SDK.
Target selection:
Error:
5. Wait for Xcode to download the source and that's it, the package is installed.
6. To resolve via terminal after adding the dependency in your project, store your credentials as follows:
- Replace
COCOAPODS_USERNAMEandCOCOAPODS_PASSWORDwith corresponding credentials
git credential approve <<EOF
protocol=https
host=repo.veryfi.com
path=shared/lens/veryfi-lens-spm.git
username=COCOAPODS_USERNAME
password=COCOAPODS_PASSWORD

EOF
After adding the dependency in your project. Running xcodebuild -resolvePackageDependencies will not fail in your pipeline
Installation with Cocoapods (Deprecated)
CocoaPods installation is deprecated. We recommend using Swift Package Manager (SPM) for new projects. CocoaPods support will be removed in a future version.
The below steps assume that you already have Cocoapods installed and initialized in your project. If you're new to
, visit the official page.1. Open your project's Podfile
2. Add the Veryfi private Cocoapods repository as a source at the top of the Podfile
Make sure that cocoapods spec repository is also specified as a source
source 'https://repo.veryfi.com/shared/lens/veryfi-lens-podspec.git'
source 'https://github.com/CocoaPods/Specs.git'
3. Add the VeryfiLens pod to your target
pod 'VeryfiLens-W2'
3.1. (Optional) In case you're using static linkage in your pods:
Install cocoapods-pod-linkage plugin https://github.com/microsoft/cocoapods-pod-linkage
gem install "cocoapods-pod-linkage"
Import it in your Podfile
plugin 'cocoapods-pod-linkage'
Make sure to put use_framework! call inside your target
target 'MyTarget' do
    use_frameworks! :linkage => :static
Lastly, import Veryfi lens pod like this
pod 'VeryfiLens-W2', 'x.x.x.x', :linkage => :dynamic
4. A minimal version of your Podfile should look similar to this:
source 'https://repo.veryfi.com/shared/lens/veryfi-lens-podspec.git'
source 'https://github.com/CocoaPods/Specs.git'
target 'VeryfiLensExample' do
use_frameworks!
pod 'VeryfiLens-W2'
end
5. Generate Veryfi Lens SDK Access Credentials to pull the Lens SDK from Veryfi's private repository.
5.1. Navigate to the Keys Section:
5.2. Choose a Platform:
Within the Keys, choose Lens: Cocoapods (iOS) section and click the "Add Access Key" button.
5.3. Fill in required information:
You will be prompted to provide the following information:
- First and Last Name
- Email Address
- Create a Password
Upon providing the required information, your username will be generated.
In the documentation, the created cocoapods username and password will be referred to as COCOAPODS_USERNAME and COCOAPODS_PASSWORD.
You can now use these credentials to access the privately stored SDK.
The password you create here will be used to access the SDK, and it won't be displayed in the Keys section again. Make sure to save it in a secure place.
5.4. Store Cocoapods Access Credentials with Git Credential Tool (Recommended)
For convenience and security, we recommend storing these access credentials using a Git Credential Storage. This will ensure that you are automatically logged in each time you install or update the Lens SDK.
Open your terminal or command prompt, navigate to your project directory, and run the following command. You'll find this same command in the Veryfi Hub after creating your API key.
- Replace
COCOAPODS_USERNAMEandCOCOAPODS_PASSWORDwith corresponding credentials
git credential approve <<EOF
protocol=https
host=repo.veryfi.com
path=shared/lens/veryfi-lens-podspec.git
username=COCOAPODS_USERNAME
password=COCOAPODS_PASSWORD

EOF
6. Install Lens
Run the command in the Terminal, in the root folder of your project:
pod install
1. Generate Veryfi Lens SDK Access Credentials to pull the Lens SDK from Veryfi's private repository.
1.1. Navigate to the Keys Section:
1.2. Choose a Platform:
Within the Keys, choose Lens: Maven (Android) section and click the "Add Access Key" button.
1.3. Fill in required information:
You will be prompted to provide the following information:
- First and Last Name
- Email Address
- Create a Password
Upon providing the required information, your username will be generated.
The generated credentials are referred to as MAVEN_USERNAME and MAVEN_PASSWORD.
You can now use these credentials to access the privately stored SDK.
The password you create here will be used to access the SDK, and it won't be displayed in the Keys section again. Make sure to save it in a secure place.
1.4. Add your Access Credentials to your system environment.
Open your system profile (~/.bash_profile, ~/.zshrc or similar) and add next environmental variables there.
Replace MAVEN_USERNAME and MAVEN_PASSWORD with corresponding credentials
export MAVEN_VERYFI_USERNAME=MAVEN_USERNAME
export MAVEN_VERYFI_PASSWORD=MAVEN_PASSWORD
2. Add the Veryfi Maven repository to the dependencyResolutionManagement.repositories section of your settings.gradle
- Groovy
- Kotlin
dependencyResolutionManagement {
    repositories {
        //Add Veryfi Maven repository for VeryfiLens SDK
        maven {
            url "https://nexus.veryfi.com/repository/maven-releases/"
            credentials {
                username = System.getenv("MAVEN_VERYFI_USERNAME")
                password = System.getenv("MAVEN_VERYFI_PASSWORD")
            }
            authentication {
                basic(BasicAuthentication)
            }
        }
    }
}
dependencyResolutionManagement {
    repositories {
        //Add Veryfi Maven repository for VeryfiLens SDK
        maven {
            url = uri("https://nexus.veryfi.com/repository/maven-releases/")
            credentials {
                username = System.getenv("MAVEN_VERYFI_USERNAME")
                password = System.getenv("MAVEN_VERYFI_PASSWORD")
            }
        }
    }
}
3. Add Veryfi Lens to the dependencies in your build.gradle (:app) file:
Replace VERSION with the latest Veryfi Lens SDK version.
Refer to
- Groovy
- Kotlin
dependencies {
    implementation 'com.veryfi.lens:veryfi-lens-w2-sdk:VERSION'
}
dependencies {
    implementation("com.veryfi.lens:veryfi-lens-w2-sdk:VERSION")
}
Whether you are creating a project from scratch or adding a Capacitor to the existing project, follow the steps in the
to make sure that the project is configured correctly.1. Install the native platforms
After the Capacitor project is configured, make sure that you have installed all the required native platforms.
npm install @capacitor/ios @capacitor/android
npx cap add ios
npx cap add android
2. Generate Veryfi Lens SDK Access Credentials
- Sign in to the API Portal.
- Navigate to the Keys section under the Settings Menu.
- Within the Keys, choose Lens: Capacitor (iOS + Android) section and click the "Add Access Key" button.
- Fill in required information:
You will be prompted to provide the following information:
- First and Last Name
- Email Address
- Create a Password
Upon providing the required information, your username will be generated.
The generated credentials are referred to as NPM_USERNAME and NPM_PASSWORD.
You can now use these credentials to access the privately stored SDK.
The password you create here will be used to access the SDK, and it won't be displayed in the Keys section again. Make sure to save it in a secure place.
3. Configure the npm registry location and credentials.
Add Access Credentials and Veryfi Nexus repository to your .npmrc configuration file
Replace NPM_USERNAME and NPM_PASSWORD with corresponding credentials.
echo "@veryfi:registry=https://nexus.veryfi.com/repository/npm/" >> ~/.npmrc
echo "config=set" >> ~/.npmrc
echo "//nexus.veryfi.com/repository/npm/:username=NPM_USERNAME" >> ~/.npmrc
echo "//nexus.veryfi.com/repository/npm/:_password=$(echo -n NPM_PASSWORD | base64)" >> ~/.npmrc
4.Add the Lens Capacitor plugin to your project
npm i @veryfi/veryfi-lens-capacitor
Whether you are creating a React Native project from scratch or using the existing one, follow the steps in the
to make sure that the project and environment are configured correctly.1. Generate Veryfi Lens SDK Access Credentials
1.1. Navigate to the Keys Section:
1.2. Choose a Platform:
Within the Keys, choose Lens: React Native (iOS + Android) section and click the "Add Access Key" button.
1.3. Fill in required information:
You will be prompted to provide the following information:
- First and Last Name
- Email Address
- Create a Password
Upon providing the required information, your username will be generated.
The generated credentials are referred to as NPM_USERNAME and NPM_PASSWORD.
You can now use these credentials to access the privately stored SDK.
The password you create here will be used to access the SDK, and it won't be displayed in the Keys section again. Make sure to save it in a secure place.
- Npm
- Expo
- Yarn 3
2. Configure the npm registry location and credentials.
Add Access Credentials and Veryfi Nexus repository to your .npmrc configuration file
Replace NPM_USERNAME and NPM_PASSWORD with corresponding credentials.
echo "@veryfi:registry=https://nexus.veryfi.com/repository/npm/" >> ~/.npmrc
echo "config=set" >> ~/.npmrc
echo "//nexus.veryfi.com/repository/npm/:username=NPM_USERNAME" >> ~/.npmrc
echo "//nexus.veryfi.com/repository/npm/:_password=$(echo -n NPM_PASSWORD | base64)" >> ~/.npmrc
3. Add the plugin to your React Native project.
npm i @veryfi/react-native-veryfi-lens
4. Install the dependencies.
npm install
2. Store Access Credentials in EAS Secrets
If you use EAS to build your iOS or Android project, you need to add in the Secrets section of your EAS project the variable environments that you set in the previous step with your credentials.
Make sure to upload this .npmrc in the root of your project.
NPM_USERNAME=[USERNAME]
NPM_PASSWORD=[PASSWORD]
2.1 Create an .npmrc file and store it in the root of your project:
The .npmrc files content should be:
@veryfi:registry=https://nexus.veryfi.com/repository/npm/
config=set
//nexus.veryfi.com/repository/:username=${NPM_USERNAME}
//nexus.veryfi.com/repository/:_password=${NPM_PASSWORD}
3. Add the plugin to your React Native project.
npm i @veryfi/react-native-veryfi-lens
4. Install the dependencies.
npm install
2. Configure the registry location and credentials.
Add Access Credentials and Veryfi Nexus repository to your yarn configuration
Replace [NPM_USERNAME] and [NPM_PASSWORD] with corresponding credentials.
yarn config set npmScopes.veryfi.npmRegistryServer "https://nexus.veryfi.com/repository/npm/"
yarn config set npmScopes.veryfi.npmAlwaysAuth true
yarn config set nodeLinker node-modules // (optional) only if having issues with node-modules
yarn config set npmScopes.veryfi.npmAuthIdent $(echo -n '[NPM_USERNAME]:[NPM_PASSWORD]' | openssl base64 -A)
3. Add the plugin to your React Native project.
yarn add @veryfi/react-native-veryfi-lens
4. Install the dependencies.
yarn install
The Veryfi Lens Flutter SDK only supports flutter >= 3.19.3 SDK versions
Whether you are creating a project from scratch or using the existing Flutter project, follow the steps in the
to make sure that it is configured correctly.1. Generate Veryfi Lens SDK Access Credentials
1.1. Navigate to the Keys Section:
1.2. Choose a Platform:
Within the Keys, choose Lens: Flutter (iOS + Android) section and click the "Add Access Key" button.
1.3. Fill in required information:
You will be prompted to provide the following information:
- First and Last Name
- Email Address
- Create a Password
Upon providing the required information, your username will be generated.
The generated credentials are referred to as FLUTTER_USERNAME and FLUTTER_PASSWORD.
You can now use these credentials to access the privately stored SDK.
The password you create here will be used to access the SDK, and it won't be displayed in the Keys section again. Make sure to save it in a secure place.
2. Add the Veryfi Lens SDK dependency to your Flutter project's pubspec.yaml file.
- Open the
pubspec.yamlfile - Add the following lines under the
dependenciessection - Replace
FLUTTER_USERNAMEandFLUTTER_PASSWORDwith the corresponding credentials - Replace
PLUGIN_VERSIONwith the listed in the section.
dependencies:
  ...
  veryfi:
    git:
      url: https://FLUTTER_USERNAME:FLUTTER_PASSWORD@repo.veryfi.com/shared/lens/flutter-plugin-veryfi-lens.git
      ref: PLUGIN_VERSION
The minimal version of the dependencies section should look like:
dependencies:
  flutter:
    sdk: flutter
  veryfi:
    git:
      url: https://XXX:XXX@repo.veryfi.com/shared/lens/flutter-plugin-veryfi-lens.git
      ref: 1.5.32
3. Install Veryfi Lens SDK
Check Official Flutter Documentation to learn how to add and install Flutter packages
- Terminal
- VS Code
- Android Studio/IntelliJ
Clean the project
flutter clean
IMPORTANT: Always clean the project after updating the Veryfi Lens Flutter plugin version, otherwise, the project might not compile
Fetch the dependencies
flutter pub get
In the menu bar, go to Terminal -> New Terminal, and run
flutter clean
IMPORTANT: Always clean the project after updating the Veryfi Lens Flutter plugin version, otherwise, the project might not compile
Click Get Packages located in right side of the action ribbon at the top of pubspec.yaml indicated by the Download icon.
In the menu bar, click on Tools -> Flutter -> Flutter Clean
IMPORTANT: Always clean the project after updating the Veryfi Lens Flutter plugin version, otherwise, the project might not compile
Click Pub get in the action ribbon at the top of pubspec.yaml.
1. With your Xamarin project open in Visual Studio, right-click on your project's Packages and select Manage NuGet Packages...
The generated credentials are referred to as DOTNET_USERNAME and DOTNET_PASSWORD.
You can now use these credentials to access the privately stored SDK.
The password you create here will be used to access the SDK, and it won't be displayed in the Keys section again. Make sure to save it in a secure place.
2. Add Veryfi Lens SDK NuGet Package
- Open your Xamarin Project
- In the menu bar, go to the Project -> Manager NuGet Packages
- In Package Sources Dropdown, select
Configure Sources... - Add a new Package Source
- Fill in the required information
Name: Veryfi
Location: https://nexus.veryfi.com/repository/nuget/
Username: DOTNET_USERNAME
Password: DOTNET_PASSWORD
If you are getting "Invalid Credentials" error, try closing and opening the Manager NuGet Packages Window one more time
3. Install Veryfi Lens Plugin package
- .NET iOS Project
- .NET Android Project
- Select
Veryfiin the Package source dropdown - Select
VeryfiLensiOSNetBinding - Add this package to your iOS .NET project
- Select
Veryfiin the Package source dropdown - Select
VeryfiLenAndroidNetBinding - Add this package to your iOS .NET project
The veryfi-lens-net-demo repository is a public .NET MAUI app you can clone and run. It shows end-to-end Lens integration on iOS and Android with one shared C# codebase.
- Repository: github.com/veryfi/veryfi-lens-net-demo
- Sample app:
VeryfiLens.Maui.Sample - Main integration:
MainPage.xaml.cs— credentials, settings,Configure, delegates, and launching camera / gallery / document browser - Credentials helper:
LensConfiguration.cs— loadsVERYFI_*environment variables orResources/Raw/appsettings.json
Existing apps using VeryfiLensiOSNetBinding / VeryfiLenAndroidNetBinding can keep those bindings. See the .NET Legacy tab. New MAUI apps should use the VeryfiLens.Maui NuGet package (see the sample .csproj).
1. With your MAUI project open in Visual Studio Code, right-click on your project's Packages and select Manage NuGet Packages...
The generated credentials are referred to as DOTNET_USERNAME and DOTNET_PASSWORD.
You can now use these credentials to access the privately stored SDK.
The password you create here will be used to access the SDK, and it won't be displayed in the Keys section again. Make sure to save it in a secure place.
2. Add Veryfi Lens SDK NuGet Package
- Open your MAUI Project
- In the menu bar, go to the Project -> Manager NuGet Packages
- In Package Sources Dropdown, select
Configure Sources... - Add a new Package Source
- Fill in the required information
Name: Veryfi
Location: https://nexus.veryfi.com/repository/nuget/
Username: DOTNET_USERNAME
Password: DOTNET_PASSWORD
If you are getting "Invalid Credentials" error, try closing and opening the Manager NuGet Packages Window one more time
3. Install Veryfi Lens Plugin package
Match the package version used in the demo project:
<!-- YourApp.csproj -->
<ItemGroup>
    <PackageReference Include="VeryfiLens.Maui" Version="2.0.57" />
</ItemGroup>